 editer@kidkosh.in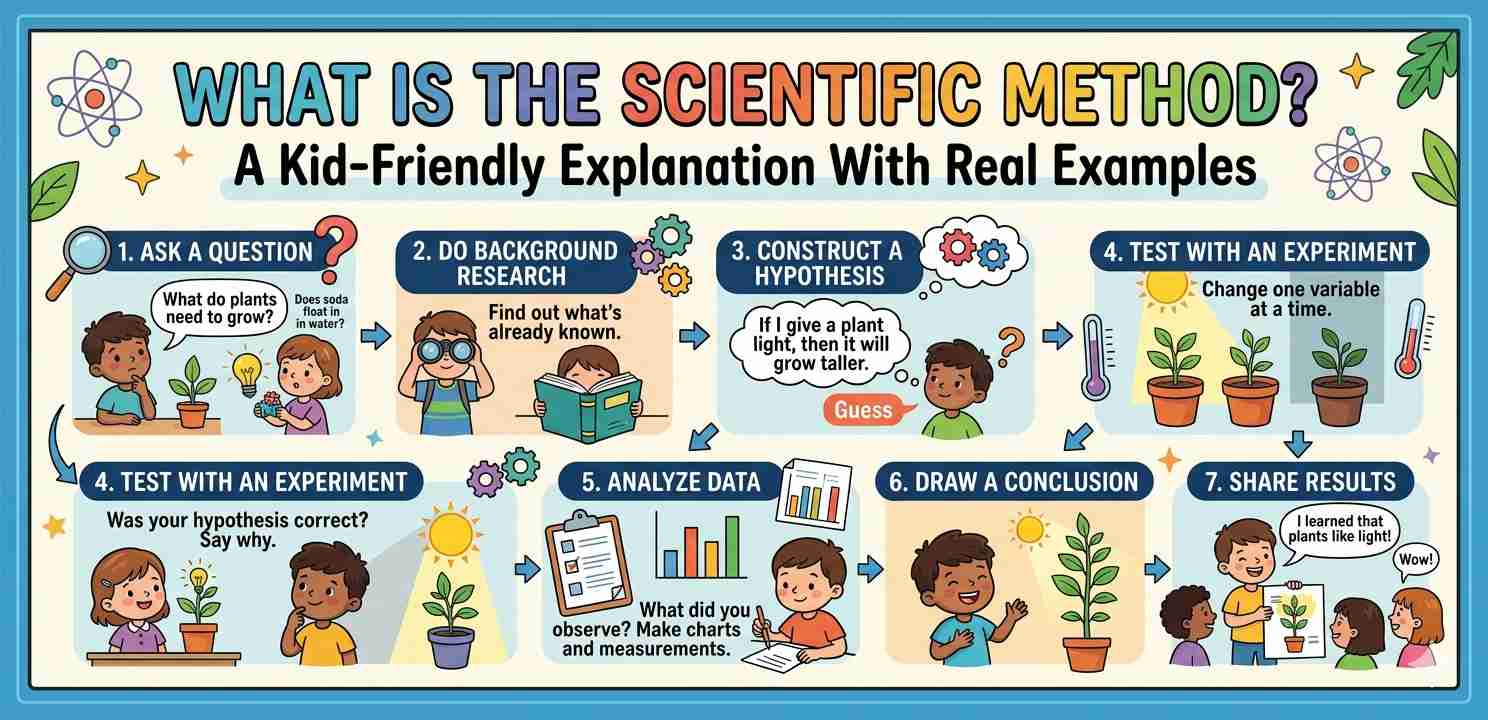
Introduction
If you’ve ever wondered why the sky turns orange at sunset, or whether plants grow better with music playing nearby, you’ve already started thinking like a scientist. The scientific method is basically a step-by-step process that helps people ask questions about the world and find real, reliable answers.
The scientific method isn’t some complicated lab technique only grown-ups use. Kids use it all the time — they just don’t always know it has a name. Once you understand how it works, you’ll start seeing it everywhere.
What Is the Scientific Method, Exactly?
The scientific method is an organized way of investigating something. Instead of just guessing or believing what someone tells you, you actually test it. You collect information, look at the results, and draw a conclusion based on what you actually observed — not what you hoped would happen.
Scientists around the world use the same basic steps. This shared process means that a researcher in India and another one in Canada can repeat the same experiment and compare their findings fairly. That’s what makes the scientific method so powerful — it’s consistent, and it removes personal opinion from the picture.
It’s also worth knowing that the scientific method isn’t a brand-new idea. People have been using versions of it for hundreds of years, though it became more formalized over time. Learn more about the history of scientific thinking at Khan Academy.
The Steps of the Scientific Method
Let’s walk through each step clearly. These steps form the backbone of the scientific method, and once you know them, you’ll never approach a problem the same way again.
Step 1: Ask a Question
Everything starts with a question. Good scientific questions are specific and testable. “Why is the sky blue?” is a great starting point. “Does cold water help plants grow faster than warm water?” is even better — because you can actually test it.
The question should be something you genuinely don’t know the answer to. If you already know the answer, there’s nothing to investigate.
Step 2: Do Background Research
Before jumping into any experiment, it helps to find out what’s already known about your topic. This saves time and helps you design a smarter test. You might look at books, websites, or ask a teacher.
This step doesn’t get talked about enough in school, but it’s really important. If someone already proved something years ago, you want to know that before spending hours on an experiment.
Step 3: Form a Hypothesis
A hypothesis is your educated guess — a prediction of what you think will happen and why. It’s not random. It’s based on what you already know and the research you just did.
A good hypothesis usually follows the format: “If [I do this], then [this will happen] because [reason].”
For example: “If I water a plant with cold water instead of room-temperature water, then it will grow more slowly because cold temperatures slow down biological processes.”
This is a core part of the scientific method — you’re not just guessing wildly, you’re making a reasoned prediction.
Step 4: Design and Run an Experiment
Now comes the part most people think of when they hear “science” — the actual experiment. But a good experiment isn’t just mixing random things together and hoping for drama. It’s carefully designed.
You need to control your variables. A variable is anything that can change in an experiment.
- The independent variable is what you deliberately change (e.g., water temperature)
- The dependent variable is what you measure to see the effect (e.g., plant height)
- Controlled variables are everything else you keep the same (same pot, same amount of water, same sunlight)
If you change more than one thing at a time, you won’t know which change caused the result. That’s why controlling variables matters so much.
Step 5: Collect and Record Data
While the experiment runs, write down everything. Don’t trust your memory. Record numbers, observations, dates, and anything unusual that happened.
Data can be numbers (how tall the plant grew each day) or descriptions (the leaves looked yellower on day 4). Both types matter. Good data is the foundation of the scientific method — without it, you’re just telling stories.
Step 6: Analyze the Results
Once the experiment is done, look at your data carefully. Do you see patterns? Did one group consistently outperform another? Did something unexpected happen?
This is where graphs and charts come in handy. A simple bar chart can make a pattern obvious that you might miss just by reading a list of numbers.
Step 7: Draw a Conclusion
Now you answer the original question. Did your results support your hypothesis, or did they go against it?
Here’s something many students don’t realize — it’s completely okay if your hypothesis was wrong. In fact, that’s often more interesting. A result that surprises you teaches you something new. The scientific method works whether your guess was right or wrong.
Step 8: Share Your Results
Real scientists publish their findings so others can read, question, and repeat their experiments. Even in a school project, writing up your experiment and sharing it with your class is following this final step.
A Real-Life Example: Testing Whether Salt Affects Boiling Water
Here’s how a kid at home could use the scientific method step by step:
Question: Does adding salt make water boil faster?
Hypothesis: If I add salt to water, it will boil faster because salt changes the properties of water.
Experiment: Boil one pot of plain water and one pot of salted water, using the same stove setting, same pot size, and the same amount of water. Time both.
Results: The plain water actually boiled slightly faster (or about the same).
Conclusion: The hypothesis was wrong. Salt actually raises the boiling point of water slightly, meaning it takes a tiny bit longer — not shorter — to boil. The result contradicted the original guess, but that’s fine. That’s exactly how the scientific method is supposed to work.
Another Example: Does Music Help Plants Grow?
This one is popular with kids because it sounds weird enough to be interesting.
Question: Do plants grow taller when music is played near them?
Hypothesis: Plants exposed to music will grow taller because sound vibrations might stimulate growth.
Experiment: Set up two identical plants with the same soil, sunlight, and water. Play soft music near one for 2 hours a day. Measure both weekly for 4 weeks.
Results: Both plants grew at similar rates, with slight variation week to week.
Conclusion: Based on this small experiment, music didn’t appear to significantly affect plant growth. A proper scientific study would need far more plants and tightly controlled conditions — but even this simple version followed all the steps of the scientific method.
Why Kids Should Learn the Scientific Method Early
Learning the scientific method early gives students a major advantage — not just in science class, but in everyday life. It teaches you to think critically, to question assumptions, and to rely on evidence rather than rumors.
It also teaches patience. Good science takes time. You can’t rush an experiment and still trust the results.
According to National Geographic Education, understanding how to investigate questions systematically is one of the most transferable skills young learners can develop.
Common Mistakes Students Make With the Scientific Method
Even when students know the steps, a few errors come up repeatedly:
Changing too many variables at once. If you’re testing water temperature AND water amount at the same time, you won’t know which factor caused the result.
Ignoring unexpected results. If something doesn’t match your hypothesis, don’t ignore it. That’s actually the most important data.
Not recording data as you go. Memory is unreliable. Write everything down immediately.
Confusing correlation with causation. Just because two things happen at the same time doesn’t mean one caused the other. The scientific method is designed to help you test actual cause-and-effect relationships, not just guess at them.
How the Scientific Method Connects to Everyday Life
You might not realize it, but you apply something close to the scientific method all the time.
When your phone battery drains fast and you think, “Maybe the screen brightness is too high” — you’ve formed a hypothesis. When you turn the brightness down and see if it lasts longer — you’ve run a test. When you check your battery stats the next day — you’ve collected data.
That’s the scientific method in your pocket. It doesn’t require a lab coat or a microscope. It just requires curiosity, a plan, and honest observation.
Final Conclusion
The scientific method is one of the most useful thinking tools anyone can learn. Whether you’re in a science fair, trying to solve a problem at home, or just trying to figure out why something happened, these steps guide you toward real answers instead of random guesses.
Start with a question. Do your research. Make a prediction. Test it carefully. Record what happens. Analyze it honestly. And share what you find.